Плюсы программы:
— Не требует инсталляции. Прямой EXE — файл.
— Работает под Win.XP, Win.7/ Win.8. Под десятку не проверял.
— Множество дополнительных функций по обработке и доработки изображения.
— Два режима стерео очков.
— Не нужно заранее обрабатывать исходное изображение и делить их на правое и левое. Эффект создается с использованием одной фотографии. Программа сама расположит их на левое и правое и наложит друг на друга.
— Простое создание.
Минус программы:
— Не русифицирована.
Этот минус мы с вами устраним, разобрав важное. Я подробно остановлюсь именно на том, что вам понадобиться для создания стереофото, остальные необязательные функции вы освоите сами. Перед тем как мы вместе создадим стереофото, разберемся в нюансах.
СЛЕДУЕТ ПРОЧЕСТЬ.
1. Стереоочки. Для этого описания и созданных мной стереоизображений я взял стандартные простые пассивные бумажные очки. Их можно купить с детской раскраской. Левая линза красная. Правая линза синяя.
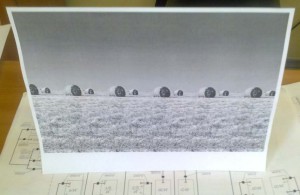
2. Фотографии. С фотографиями я пошел по пути от сложного к простому. Почему от сложного? Для вашего понимания. Разберем два фото. Фото Су-34, может и 35, поправьте если что. Второе фото космонавта с Роскосмоса. На оригиналах вы видите один существенный недостаток для создания стерео.
К примеру, на фото Су, самолет “маскируется” своим окрасом с фоном неба. На фото космонавта с МКС, в открытом космосе, его кисть руки с призывом: “Хорош бухать! Откройте!!!” сливается с цветом скафандра.
В этих примерах сложность в том, что нам необходимо создать видимость объема, а эта необходимая нам видимость сливается. При создании своего стерео всегда обращайте на основной фон, детали и их расположение. Контрастность главного изображения и фона и есть залог удачного стереоэффекта.
3. Фон должен быть второстепенным, но не расплывчатым. При этом! Чем больше объектов на главном плане, тем сложнее создать стереофото. Особо сложно этого добиться, когда множество изображений разноцветных и ярких смешаны с первым планом, вторым планом и фоном.
4. Не забывайте главного. Ваша стереофотография не должна искажать оригинал. Она должна быть его повторением, даже если вы создаете фрагмент.
5. Создавая стереофото, берите за основу фотографии с одним или двумя объектами главного плана изображения фотографии. Не все фотографии могут быть объемными. В стереофильмах таким сложным изображениям создают обратный эффект. Не объем, а глубина и это тоже интересный стереоэффект.
6. Любой стереоэффект замечательно смотрится с расстояния не менее 1 метра!
Как сделать стерефото
Многие видели 3D стерео фото, но не все знают, что такие фотографии можно сделать своими руками. На самом деле, это не так сложно, весь процесс состоит из двух этапов: стереосъемка и объединение ракурсов. Я уже чувствую, как желание делать свои 3D фотографии переполняет вас. Если это так, то читаем внимательно о том, как сделать стереофото…
Принцип стереофотографий основывается на бинокулярном зрении, т.е. на том, что мы видим окружающие предметы двумя глазами. Изображения, полученные каждым глазом, немного отличаются из-за параллакса (предметы смещены относительно друг друга), мозг получает их и преобразует в одну объемную картину. Вот и выходит, что для достижения объемного 3D эффекта нужно смоделировать описанное выше. Для этого необходима съемка с двух точек, а потом и объединение полученных фотографий в одну, но так, чтобы каждый глаз мог видеть только предназначенное для него изображение.
Содержание страницы
Стереосъемка
B=0,03 D
где D – расстояние до фотографируемого объекта, B – стереобазис.
На практике же, никто не рассчитывает стереобазу каждый раз, подбирается среднее значение, например, 10 см, при которых стереосъемка будет нормальной на расстоянии от 4 до 30 м.
Для 3D съемки создают специальные системы из двух фотоаппаратов, называемых фотоспарками:

Чаще всего фотоаппараты синхронизированы для обеспечения возможности съемки движущихся объектов. Существует несколько способов синхронизации фотоаппаратов.
Для стереосъемки не обязательно иметь два фотоаппарата, начинающие любители 3D могут использовать только одну, уже имеющуюся у них фотокамеру. Для этого нужно делать два снимка со смещением: делаем первое фото, а затем перемещаем фотоаппарат на величину стереобазы вправо и делаем второе фото. При этом нужно стараться держать камеру ровно, без перекосов – это упростит дальнейшую обработку. Для упрощения 3D съемки одним фотоаппаратом, можно использовать штатив:

перемещать фотоаппарат от глаза к глазу:

главное — держать фотоаппарат ровно.
Съемка одним фотоаппаратом удешевляет весь процесс, но у этого способа есть существенный недостаток – нельзя делать 3D фото движущихся объектов.
Для осуществления качественной 3D фотосъемки лучше всего использовать направленный метод, но его не всегда получается применить в динамичных условиях или при наличии только одного фотоаппарата.
Итак, после стереосъемки мы имеем два ракурса одного предмета:

теперь нам предстоит объединить их одну 3D фотографию.
Объединение ракурсов.
Первым делом необходимо произвести выравнивание левого и правого ракурса, это нужно из-за перекосов во время съемки (чаще всего при использовании одной камеры). Использование синхронизированной фотоспарки сводит этот этап к минимуму. Затем объединим ракурсы в одно 3D фото. Существует несколько форматов стереофотографий, например, анаглиф или стереопара (side-by-side).
Выравнивание и объединение можно выполнить в любом графическом редакторе, таком как Photoshop, создание анаглиф фото в нем, не составит большого труда. Но лучше всего использовать специальную программу для создания 3D стереофото, самой качественной, на данный момент, является StereoPhoto Maker. Процесс изготовления 3D стереофотографий при помощи этой программы очень прост и сводится к нажатию нескольких кнопок – подробное описание StereoPhoto Maker.
Загружаем StereoPhoto Maker:

Нажатием кнопки (1) и выбираем левый и правый ракурс. Нажимаем кнопку (2) для автоматического выравнивания, программа сделает все сама. Теперь соединим ракурсы в анаглиф стереофотографию, для этого жмем кнопку (3) и выбираем вариант формата анаглиф, наиболее оптимальный – Optimized Anaglyph. Сохраняем результат: File > Save Stereo Image. Все, наша стереофотография готова, объем можно увидеть через красно-синие анаглифные очки:

Мы рассмотрели процесс создания 3D фото в автоматическом режиме, но StereoPhoto Maker имеет еще множество дополнительных настроек, которые повышают качество стереофотографии, о них в полном описании программы.
На этом все, в результате вы получите 3D стереофотографию, которую можно просматривать несколькими способами. Удачи в создании 3D стерео фотографий своими руками.
Тэги:3D софт3D фотоКак известно, анаглифную стереокартинку делают из двух фото, выполненных с разных ракурсов. На этом уроке вы научитесь создавать анаглифные 3d фото и стерео-варио из одного изображения.
Для этого нам понадобится сама исходная картинка и две программы – Adobe Photoshop и 3D Masterkit.
Итак, начнем. На первом этапе изготовим маску глубины нашей фотографии. Это такая черно-белая картинка на которой чем темнее точка, тем глубже находится соответствующая ей точка на картинке исходнике и наоборот.
Откойте в фотошопе исходное фото. В правой колонке на вкладке «Слои» щелкните правой кнопкой мыши по фону исходника и в открывшемся списке выберете «Дублировать слой

Для собственного удобства я сделал картинку черно-белой. Хотя это непринципиально.

Инструментом «Лассо» в левой панели инструментов обведите каждый объект на фото и щелкнув по нему правой кнопкой мыши создайте новый слой выбрав «Слой через копирование«. Создавать новые слои целесообразно только из тех объектов, которые находятся в разных плоскостях или другими на удалении друг от друга.

Когда слои из всех объектов на фото будут готовы, сделаем слой из горизонтальной поверхности (земли) но уже через «Обрезание«.

Чтобы выделить последнюю часть нашей картинки (каменная стена на заднем фоне) для создания последнего слоя, выполним следующее:
— инструментом волшебная палочка выделим всю пустую область внизу картинки (бывшая земля) и далее «Выделение» ? «Инвертировать выделение«. Вся стена с ее нижними границами будет выделена точно по контуру.
Делаем из нее последний слой.

Итак, у нас получилось 6 слоев. Слой 1 – сам император Август, слои 2,3,4 – три грани его пьедестала, слой 5 – горизонтальная поверхность или земля и слой 6 – вертикальная поверхность или стена.

На вкладке «Слои» в правой колонке оставим активным слой 5. Выделим его используя инструмент «Волшебная палочка» и после «Инвертировать выделение» (как уже делали это выше). Удалим выделенное изображение кнопкой Delete на клавиатуре и инструментом «Градиентная заливка» зальем слой. Предварительно, перед использованием инструмента «Градиентная заливка«, в палитре цветов выбираем оттенки для начальной и конечной заливки градиента.

Инструментом «Пипетка» выбираем самый темный участок слоя 5 и этим оттенком заливаем слой 6.

Таким же образом, используя инструменты «Пипетка«, «Заливка» и «Градиентная заливка«, заливаем все остальные слои.

Объединим слои. Щелкаем «Слой» ? «Выполнить сведение«.

Выполним смазывание картинки чтобы не было резких переходов на границах слоев. Для этого щелкаем «Фильтр» ? «Размытие» ? «Размытие по Гауссу«.
Эти команды, в зависимости от версии фотошопа, могут иметь разные названия. Например в более ранней версии эти команды – Фильтр ? Смазывание ? Смазывание Гаусса.

Вот что у нас получилось

Первый этап на этом завершен. Теперь вы сможете самостоятельно сделать маску глубины для любого фото.
И наконец самый приятный и завершающий этап. В 3D MasterKit, в его правой колонке «Слои«, откроем исходную картинку и ее маску глубины. Щелкаем по кнопке «Генерировать» и получаем 12 кадров (кадры сгенерированы таким образом, будто вы их сняли с разных ракурсов).

В панели «Навигатор» щелкаем по кнопке «Пуск» и получаем стерео-варио:

Тут же, на соответствующих вкладках, можно получить следующие стереокартинки:
- • cтереоскоп – кодированное изображение для просмотра через линзовый растр;
- • анаглиф – монохромные, квази-цветные, цветные изображения для просмотра через двухцветные, красно синие анаглифные очки;
- • прямой просмотр – стереопары для просмотра параллельным и перекрестным способами, не требующие дополнительных приспособлений;
- • интерлейс – стерео карточки для просмотра в стереоскопе;
- • растр – черезстрочные 3D изображения для просмотра через жидкокристаллические очки шторного типа.
Про эти картинки я напишу позже, а вот анаглиф здесь получается грубовато. Поэтому я его сделал в фотошопе по методике, описанной мной в статье Как сделать анаглиф (анаглифические фото) своими руками в Adobe Photoshop. Для этого необходимо сохранить сгенерированные в 3D MasterKit кадры и использовать первый кадр для левого глаза а последний для правого.
И вот конечный результат:

Надеюсь, все подробно и понятно описал, если будут вопросы или предложения, пишите в комментариях.
Как сделать стереограмму в Adobe Photoshop
Возможностью сделать стереограммы со скрытым изображением прямо в фотошопе мы обязаны плагину «Stereogram Lab Filter 1.0«, написанному мастером своего дела [urlspan]3Dimka[/urlspan], стерограммами которого я не перестаю восхищаться.
Но ближе к делу. Скачать плагин можно здесь. Распакуйте архив расширения и полученную папку скопируйте в директорию Plug-In вашего фотошопа.
После запуска Potoshop в меню «Фильтр» появится подменю «Stereogram Lab«.
Далее вам понадобятся две заранее приготовленные картинки: текстура и маска глубины. Как их сделать почитайте в статьях этой рубрики и кроме этого скоро здесь появится статья на тему «Как сделать маску глубины в Photoshop».
Теперь осталось самое простое:
1. Откройте в фотошопе вашу текстуру. При необходимости инструментом «Выделить» выделите ту ее часть, которая будет применяться для генерации стереограммы.
Совет: При выделении части текстуры из картинки учтите то, что высота ее должна быть равна высоте маске глубины. Ширину обычно выбирают равной 90 или 100 пикселей.
2. В меню фотошопа перейдите Фильтр ? Stereogram Lab ? Set Texture.

Откроется окно предварительного просмотра заготовки вашей текстуры. Нажмите на кнопку «ОК«.

3. Откройте маску глубины и перейдите Фильтр ? Stereogram Lab ? Hidden Image Stereogram.

4. В открывшемся окне настроек передвижением ползунков поэкспериментируйте с параметрами генерации будущей стереограммы.
- Reheats – количество полосок текстур по ширине.
- Depth% — процент глубины скрытого изображения.
- Oversamply – качество рендеринга.
- Start% — позиция на стереограмме, с которой начнется ее генерация.

5. Нажмите «ОК» и наслаждайтесь полученным результатом.
Полученную картинку под названием «Поросенок» вы можете увидеть в галерее 3D стереограмм.
Что это? Как научиться смотреть стереограммы?
ЧТО ТАКОЕ СТЕРЕОГРАММЫ
SIRDS (Single Image Random Dot Stereo grams) или стереограммы, стерео картинки — это графические изображения, при особом рассмотрении которых можно увидеть объемное стереоизображение, спрятанное в картинке.
3D — стереограмму можно отнести к одному из видов современного искусства, использующему новейшие разработки в области компьютерной графики, создающему иллюзию объема на основе двухмерного рисунка.
Стерео изображение на этой стерео картинке можно увидеть на экране монитора, изменять размеры стерео картинки, распечатать ее на принтере (цветном или черно-белом) и даже сфотографировать. При всем этом эффект стереоизображения не меняется.
Рассматривание стереограмм чрезвычайно полезно для глазных мышц,поэтому это увлекательное занятие называют спортом для глаз. Во время нескольких первых занятий со стереограммами вы можете почувствовать усталость, но это служит лишь доказательством эффективности подобного рода упражнений — точно так же после посещения тренажерного зала болят мышцы у нетренированного человека.
Сейчас стереограммы применяют в лечении ранней стадии близорукости. Просмотр стерео грамм снимает усталость глаз и полезен тем, чья работа связана с напряжением зрения !!!
КАК РАБОТАЮТ СТЕРЕОГРАММЫ
Эффект SIRDS связан с особенностями восприятия мозгом направления взгляда.
Лучи зрения каждого глаза при фокусировке на предмете пересекаются. Благодаря анализу углов поворота лучей мозг делает вывод о расстоянии до предмета. Выполняется этот анализ посредством сравнения двух картинок, формируемых глазами, и поиска общих фрагментов, для совмещения которых требуется менять углы лучей зрения.
На стерео картинке для создания видимого объема используются фрагменты одного цвета (яркости) и фона, определенным образом скомпонованные с фоновым изображением. Таким образом SIRDS возникают благодаря обману мозга перестановкой одинаковых фрагментов изображения.
КАК НАУЧИТЬСЯ СМОТРЕТЬ СТЕРЕОГРАММЫ
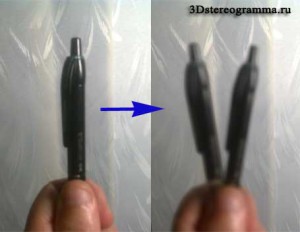
Возьмите карандаш или ручку, держите его за нижний конец вертикально на расстоянии 15 — 20 см от кончика носа так, чтобы верхний конец карандаша был на уровне глаз. Теперь посмотрите мимо карандаша на какой-нибудь предмет и вы увидите, что карандаш как бы раздвоился.
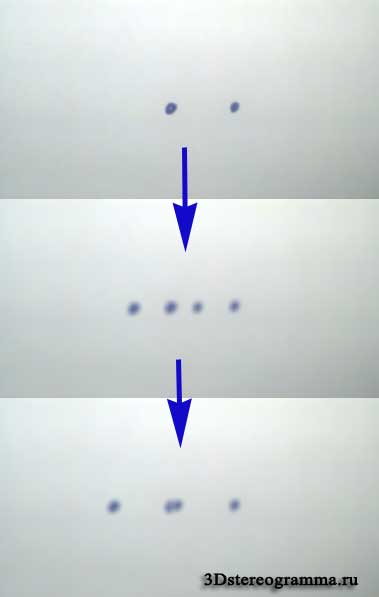
Если вы научились легко «раздваивать карандаш», попробуйте следующее упражнение: нарисуйте на листе бумаги две горизонтальные точки на расстоянии 2-3 см друг от друга. Посмотрите сквозь лист так, чтобы каждая точка раздвоилась аналогично как карандаш. Две точки должны раздвоиться в четыре. Теперь попробуйте удалить лист бумаги от себя так, чтобы две средние точки слились в одну. Если вам это удалось вы можете приступать к рассматриванию стерео картинок.
Приблизьтесь к листу стерео картинки (если в руках лист будет дрожать, то у вас ничего не получится) или к монитору вплотную так, чтобы вы не смогли сфокусироваться на картинке (изображение в глазах станет расплывчатым). Далее медленно удаляйте голову от монитора, направление взгляда не меняйте и не моргайте.
Постепенно мутные пятна начнут вырисовываться в очертания объемного изображения. После того, как вы «увидели» стереокартинку, можно аккуратно менять угол взгляда, отдаляться от картинки — объемная фигура не исчезнет!
Посмотрите серию из сериала «Универ» про стереокартинки. Основная комедия с разглядыванием стереокартинок начнется примерно с 1/4 от начала фильма.
Многие из нас помнят весёлые школьные тетрадки, которые покупались в магазине только из-за их обложки. И пусть это были тетрадки для первоклашек в смешную косую линейку, мы всё равно забирали их в свою коллекцию — ведь там были НОВЫЕ СТЕРЕОРИСУНКИ!
Так что же это за чудо такое? Как могут глаза увидеть то, чего вроде бы и нет? Да ещё в 3D-формате?
На самом деле, принцип работы стереокартинок (англ. SIRDS — Single Image Random Dot Stereograms) помогут объяснить сразу три науки: оптика, физиология и даже психология.
Всё дело в том, что люди смотрят на мир двумя глазами, и каждый из них видит своё отдельное изображение под определённым углом.
Потом оба этих изображения совмещаются в голове в одно целое. А что случится, если в мозг «отправить» не две похожие картинки, а целый ряд почти идентичных фрагментов? А случится вот что: мозг совместит их неправильно и с ошибочным углом. Тогда человек сможет увидеть то, чего на основной картинке нет!
Теперь дело за компьютерной программой, которая может подобрать такие фрагменты, которые сформируют в мозгу конкретное скрытое изображение. Для этого часто используют такие приложения как Stereogram Workshop, 3DMiracle, Popout-Pro и даже Photoshop+3DMAX.
Интересно, что такие картинки замечательно тренируют глаза, так как способствуют снятию спазма и напряжения. Также они помогают расслабиться и нервной системе!
Если вы хотите увидеть спрятанное изображение, старайтесь смотреть не на сам рисунок, а как бы сквозь него. Представьте, что он прозрачен, а вам нужно свести взгляд в точку позади картины.
Многие сначала приближают картинку к носу, а потом медленно удаляют её на расстояние 30-40 см, стараясь не концентрироваться взглядом на конкретных линиях.
Если сразу увидеть «чудо» не получится — не расстраивайтесь. Потренируйтесь ещё! Только 1% людей не могут увидеть стереорисунок, так что шансы у вас более чем высокие.
Каждый раз вам будет нужно всё меньше времени, чтобы вычислить спрятанный стереосекрет. Главное — не напрягайте глаза!
Источник: fit4brain.com
Загрузка…
Создаём стереофото в домашних условиях! — Ferra.ru
Процесс создания стереофотографии в общих чертах достаточно прост.
Мы фотографируем интересующий нас объект с нескольких ракурсов, затем совмещаем полученные изображения с помощью соответствующего программного обеспечения и преобразуем в чересполосное изображение. После этого накладываем линзовый растр и получаем стереоизображение.
А теперь, убедившись в том, что всё просто, давайте посмотрим, как оно на самом деле. Потому что каждый из обозначенных этапов процесса имеет свои особенности и тонкости, и лучше сначала семь раз отмерить, чем семь раз отснять и впоследствии убедиться, что отснятые снимки ни на что не годны.
Если у нас один фотоаппарат для съёмки с разных ракурсов, то объект фотосъёмки должен быть неподвижным. Если объект подвижен, то нам потребуется единовременная съёмка с разных ракурсов. А это уже делается с помощью линеек камер, синхронизированных между собой. Впрочем, и неподвижных объектов для фотосъёмки найдётся немало. Более того, портретную стереосъёмку совершенно спокойно можно делать одной камерой, быстро перемещаемой по специальным рельсам.
Но для знакомства с технологией мы выберем что-нибудь попроще.
Сам процесс съёмки стереоракурсов может выполняться разными способами. Если это съёмка пейзажей и отдалённых объектов, камеру можно двигать прямолинейно, слева направо или справа налево, перемещаясь приставными шагами. В этом случае наше смещение в масштабах кадра невелико. Если же объект находится близко, перемещать камеру надо по окружности, центр которой находится внутри объекта. Иначе на втором-третьем кадре снимаемый объект просто исчезнет из поля зрения.
Величина смещения камеры в обоих случаях тоже не может быть произвольной: от неё зависят резкость итогового изображения, глубина резкости и размер картинки, который мы сможем напечатать.
В общем, перед началом съёмки желательно написать её сценарий и рассчитать все параметры съёмки с помощью программки MultiStereobase, которая входит в комплект поставки программы PhotoProjector Easy. Это программное обеспечение было любезно предоставлено мне его разработчиком – Евгенией Вазенмиллер.
90000 How To Build Your Own 3D Stereo Camera 90001 90002 90003 90002 If you ever thought about taking 3D photos or video you are going to love this tutorial. It is based around the oldish Ricoh GX8, but you can adapt it to any camera you desire, as long as you can trigger them remotely. The general idea is quite simple, and here is the outline for it: 90003 90002 Take a two digital cameras which can be triggered remotely. Make a frame for the cameras with two compartments, so they are parallel to each other.Make / buy a Y splitter so you can trigger both left and right camera simultaneously. Put the left and right image together using StereoPhoto Maker. Make your own stereo viewer and enjoy your own 3d images. 90003 90008 The Dimensions of the frame 90009 90010 90011 For the outer dimensions I used my own hands and two Ricoh GX8 and a CA-1 remote control. 90012 90011 The frame is 260 mm wide and almost 175 mm height. 90012 90011 The spacing between the camera lenses is around 85 mm, and this is the distance you would have to use no matter which camera couple you are using.90012 90017 90008 Building Instructions for the frame 90009 90002 90003 90022 90011 The dimensions of the upper and lower parts A are 12 x 27 x 260 mm. 90012 90011 The dimensions of the four standing parts B are 18 x 27 x 150 mm. 90012 90011 The inner dimensions are: aa = 28 mm, bb = 68 mm and cc = 92 mm. 90012 90011 In the two inner standing parts B need a hole for the two ¼ inch camera screws. 90012 90011 The height for the two camera screws ( «tripod plates») ab = 80 mm 90012 90033 90002 Now here are some more tidbits to explain the photo to diagram relations 90003 90010 90011 The outer-left frame (part B) also have some room for the camera release CA-1.90012 90011 To hold everything together I used eight furniture bolts barrel nuts M6 x 45mm. 90012 90011 To actually enjoy holding the wooden frame you’ll have to round the edges. For this I used a router. 90012 90011 The mini USB port is on the side of the camera and it’s close to the lower part A. Room has to be made for the two mini USB connectors of the Y-splitter. 90012 90017 90002 90003 90008 Further improvements to the frame can be made (though they are not in my build) 90009 90010 90011 A level can be added for getting horizontal horizons.90012 90011 Four rubber feet can be added to protect the cameras when the frame is lying on a table. 90012 90011 Two angle hooks can be added for easy alignment of the cameras after changing the batteries or the left and right SD-cards. 90012 90011 Adding a third ¼ inch camera screw at the bottom of the frame the camera can be fitted on a tripod. 90012 90011 Adding a camera strap for carrying on the shoulder 90012 90017 90002 90003 90008 The Building Instructions for the Y-splitter 90009 90002 The building of the Y-splitter is trivial: 90003 90022 90011 Cut the two cables in two.90012 90011 The cable length on the two mini-USB connectors should be around 10 cm. 90012 90011 The cable length on the female USB-connector can be around 5 cm. 90012 90011 Remove the inner parts of the female Din loudspeaker connector. 90012 90011 Drill a hole in the female loudspeaker connector part where the two mini-USB cables fit through. 90012 90011 The female USB-cable fits through the other side of the connector. 90012 90011 Assemble the Y-splitter by connecting the wires with the same colour together and isolating them with tape.The two parts of the female loudspeaker connector can now be put together again. 90012 90033 90002 90003 90008 Assembling 90009 90002 By adding the cameras, the frame, the remote release, the Y-splitter and the female mini-UB Male USB — connector together you should get your stereo camera. 90003 90002 90003 90002 It should look something like this. 90003 90002 90003 90002 90003 90008 Creating the stereo images 90009 90002 With this camera you get left and right images. In order not to get confused you better mark the SD-cards with L (left) and R (right).You can use StereoPhoto Maker to create the type of 3D-image you want. I’m rather lazy so I just put them together as a 10 x 15 cm print. 90003 90002 90003 90008 Viewing stereo print 90009 90002 For viewing I use a plastic «Lorgnette» Stereo-Viewer. They are really cheap, about € 2,50. 90003 90002 90003 90002 To make viewing easier I put the Loregnette on a frame, which can hold 10 to 20 pictures. 90003 90002 90003 90002 Here are some of the photos I made: 90003 90002 90003 .90000 StereoPhoto Maker (English) 90001 StereoPhoto Maker (English) French 90002, German 90003, Japanese 90004 90005 90006 90005 90008 StereoPhoto Maker (SPM) functions as a versatile stereo image editor \ viewer and can automatically batch-align hundreds of images and mount them to the ‘window’. 90009 90006 90005 90008 It may be run on all versions of Windows and PowerPC and Intel Macs (with emulation or virtual-machine software). 90009 90014 StereoPhoto Maker on Mac (for Mac OS Sierra) 90006 90005 It also allows users with no knowledge of HTML to create WebPages using the ‘StereoPhotoViewer Applet’.You simply upload the contents of the applet-project to a Server using a freeware FTP program. More experienced users can create the entire webpage themselves or amend the file produced by SPM. 90006 90005 90008 StereoPhoto Maker Pro Newly released (20 / May / 2020) 90009 90014 I think the conventional version (32bit) is more stable, but the Pro version (64bit) has cooler icons and can handle larger images. 90014 If you have any feedback on the StereoPhoto Maker, please post it on this board. 90006 90005 90008 Download; 90009 90014 StereoPhoto Maker Pro (64bit) Ver6.03 2876KByte 30 / Jun / 2020 90014 StereoPhoto Maker (32bit) Ver6.03 1682KByte 30 / Jun / 2020 90014 StereoPhoto Maker Ver4.34 include help file 24429KByte 10 / JUL / 2011 90014 Online help 90014 A very useful ‘SPM Beginner’s Guide’, ‘BeginnersSPMGuideIllustrated_FujiW1_V3’ and ‘SPM Clone Tool Instructions’ has kindly been provided by David Starkman, and ‘Stereo Cards (ProShow)’ or ‘Stereo Cards (PDF)’ by David Kuntz, and ‘An illustrated Beginner’s Guide to StereoPhotoMaker’ by StereoDoro. 90006 90005 Ver6.02-> 6.03 90014 Fixed a problem that could not be converted when you select only one file to convert the selected file in multi-conversion. 90006 90005 Ver6.01-> 6.02 90014 Minor bug-fix 90006 90005 Ver6.00-> 6.01 90014 Fixed a bug that only half of the files are processed when ‘Multi job’ is checked in ‘multi conversion’. 90006 90005 Ver5.52-> 6.00 90014 StereoPhoto Maker Pro (64bit) newly released 90014 Added mirror mode to HTML5 stereo viewer. 90006 90005 Ver5.50-> 5.52 90014 -Add «Force square» option to Image with border setting 90014 -Made it possible to activate image with border with the tool button 90014 -Added black and white binarization 90006 90005 Ver5.41-> 5.50 90014 Up to now, the maximum number of files that can be processed by multi-conversion was 2500. This version removes this limitation. 90014 (Internally, it’s a big change. If you find a problem please let me know) 90006 90005 Ver5.40-> 5.41 90014 Added «Image with border (SBS, LR / RL, LRL)» as a new stereo display format 90006 90005 Ver5.31b-> 5.40 90014 Add «Round Corners» and «Fuzzy gradient» options in «MENU-> File-> Save Universal View-> Border setting» 90014 Make German version by Werner Bloos 90006 90005 more history… 90006 90005 90008 Great thanks to David Sykes for the English-language documentation. 90009 90006 90005 90008 Samples; 90009 90014 Stereo Photo Samples 1 90014 Stereo Photo Samples 2 90014 Popup Anaglyph Samples 90014 Auto Alignment Sample Images 90006 90005 Show / Edit GEO tags 90014 Auto Alignment (autopano) 90014 Batch Auto Alignment of Stereo Pairs using Autopano or Autopano-sift 90014 Create ‘wobble’ or ‘wiggle’ animated GIF’s 90014 Associating with InternetExplorer 90014 How to create Popup Anaglyph 90014 Using twinned -cameras with SPM 90014 Running two Instances of ‘Open Image file list’ 90014 ‘Add Overlay Image’ feature 90014 Viewing Mirrored Images with Single Monitor 90014 Print Stereo Card… 90014 Alignment mode 90014 Resampling mode 90014 No Jpeg Compression Ghosting for Anaglyph 90014 Automatically adjusts an image to the color / brightness 90014 HSL (hue, saturation, lightness) color-adjustment mode 90014 90006 90005 90008 Most stereo-viewing methods are supported together with a monoscopic mode: — 90009 90006 90005 — Autostereoscopic displays using vertical interlacing 90014 — IZ3D monitor, Sharp 3D LCD, 3D DLP TV. 90014 — Single 2D image (useful for saving or printing) 90014 — Freeviewing (Parallel-eyed or Cross-eyed) 90014 — Color anaglyphs or Grayscale anaglyphs (red-cyan, red-green, red-blue, yellow-blue with gamma correction ) 90014 — Liquid Crystal Shutter Glasses (horizontal or vertical Interlacing or Page Flipping) currently requires Winx3D, the NVidia Stereo Driver, NVidia 3D Vision or a graphics card supporting quad-buffered OpenGL.90014 Winx3D is no longer available from the original website. 90014 This was discussed on ‘stereo3d’ forum and a Link given for the archived documentation. 90006 90005 Alternatively, RivaTuner may be used to patch an NVidia GeForce to a ‘Quadro’ making OpenGL stereo and other ‘professional’ features available. 90006 90005 OpenGL stereo is the only mode that lets you display a stereo image in a normal window. 90014 You can open multiple instances of SPM to create many stereo windows that may be aligned, moved or resized.90014 For the NVidia link, ensure your browser Java-scripting is enabled and in the three columns 90014 select ‘Consumer3D Stereo’, ‘All Graphics Cards’ and ‘Windows98 / ME / 2000 / XP’before clicking’ Go! ‘ . 90014 You can also download the NVidia Stereo User Guide. 90014 Run the NVidia tests to determine the fastest refresh-rate for your monitor at each required screen-resolution. 90006 90005 90008 Runtime Options 90009 90006 90005 SPM may be opened from it’s Icon, a shortcut, dragging-and-dropping an image or image-pair onto the icon or already-opened window, from a batch-file or by file-extension association.90006 90005 Associate a file extension with SPM and open in a window or fullscreen with preferred viewing mode. 90014 Command-line options allow you to specify an image or an image-pair or start a slideshow. 90014 The SPM Program-window may be maximised on startup if desired. 90006 90005 90008 Image Viewing 90009 90006 90005 Support for MPO files, as used by the Fuji Real 3D digital stereo camera. 90014 User-defined grid-overlay in all stereo viewing modes except page-flipping. 90014 Create 360 degree stereo panoramas using a single rotating real or virtual camera 90014 Auto-scrolling of horizontal and vertical stereo Panoramas.See animation 90014 Continuous rotation of 360 degree stereo panoramas (without requiring quad-buffered OpenGL graphic-card) 90014 Use a household mirror to encourage the general public to enjoy stereo images without freeviewing or anaglyph glasses 90014 Select screen background color 90014 Define a tricolor image -border and Show / Hide it from the toolbar 90014 Add stereo, drop-shadow text to image 90014 Add a stereo logo to the image 90014 Save / restore all settings associated with a default text (such as a Copyright notice) 90014 Save / restore all settings associated with a default logo 90014 Zoom In and Zoom Out (operated with mouse wheel) with resampling OFF (for speed) or ON (for image quality).90014 Image Scroll (operated with mouse drag) 90014 Left-Right Image swap 90014 View vertical panoramas of planetary surfaces 90014 Support for a two or three-button mouse 90006 90005 90008 Image Manipulation 90009 90006 90005 Project stereo image onto a sphere. 90014 Single or multiple floating windows to reduce anaglyph ghosting problems 90014 Create images for display on 3D-ready DLP TV’s. 90014 Clone brush to adjust stereo depth of incorrectly positioned features. 90014 Automatically align and correct stereo-pairs and mount them to the window.90014 Automatic cropping of blank space after certain Easy Adjustment operations. 90014 Image may be corrected for vertical disparity error with a resolution of one pixel and positioned in stereo-space. 90014 Reduced ghosting for anaglyphs using realtime Lab and RGB color-space controls. 90014 Manual color-adjustment in realtime using HSL color-space. Work on entire color-range or just a particular hue. 90014 Fuzzy Borders may be added to reduce retinal-rivalry caused by stereo-window violations.90014 Automatically adjust the brightness / color of one image to a correctly-exposed reference image. 90014 Define a pair of homologous points that SPM will automatically position at the stereo-window, correcting any vertical error. 90014 Add Overlay Image to your background for decorative framing or simple stereo-compositing. 90014 Create a Popup Anaglyph still-image or object-movie for print or flat-screen viewing. 90014 Custom Optimization of Anaglyph R, G, B mixing and contrast. 90014 Save and Restore Custom optimized anaglyph parameters.90014 Save a JPG anaglyph with no compression ghosting. 90014 One or both images may be mirrored horizontally or flipped vertically to accomodate any custom / commercial taking and viewing equipment. 90014 Image frame may be rotated 90 degrees left or 90 degrees right or image-pair may be rotated within frame by any angle. 90014 Hue, saturation, lightness and gamma of the individual images may be altered. 90014 The images may be sharpened 90014 Crop the image to any size or to one of five custom-sizes 90014 Crop the image to a user-defined aspect-ratio 90014 Accurately crop large, zoomed-in images (such as panoramas) 90014 Resize using pixel-resize or bilinear interpolation, retaining aspect-ratio if desired 90014 Resize image in fine increments of 0.1% (useful when using cameras in tandem or correcting lens mismatch). 90014 When resizing, retain aspect-ratio with or without a border 90014 Automatic correction of image-rotation errors 90014 Manual correction of image ‘keystone’ errors. 90014 Manual correction of barrel-distortion, especially in wide-angle lenses 90014 Overlay a user-defined grid on images in Easy Adjustment mode 90014 Edge-detection filter to simplify image-correction or for creating a pictorial effect 90014 Alignment information may be saved in SPM’s own uncompressed DAS file-format 90014 Mosaic image-strips (produced by a stereo, virtual camera in 3D Rendering programs) into panoramic images 90006 90005 Universal Freeview L-R-L to provide website visitors with parallel and cross-eyed viewing options.90014 Convert MPO files (as used by the Fuji Real 3D digital stereo camera) into other formats for alternative viewing methods. 90014 Extract the separate left / right images from MPO files. 90014 Convert existing JPG images to MPO files for viewing on Fuji W1 camera or V1 viewer. 90014 Dual processor support 90014 Formating of images for digital projection. 90014 Lossless Creation of LRL or RLR side-by-sides triplets from existing JPG images. 90014 Fully-automatic correction and mounting to the window of hundreds of images, including support for dual-core processors.90014 Correction of barrel-distortion using previously-determined parameters for a particular focal-length. 90014 Lossless Jpeg Multi Conversion applies swapping, joining and rotation to JPG images completely without loss. 90014 Embed a correctly-orientated thumbnail image in saved JPG images so that ‘Windows Explorer’ displays them properly. 90014 Multiconvert multiple left / right files to SPM’s own uncompressed DAS format. 90014 Use the clipboard to copy or move your favorite images between folders.90014 Quickly scan a folder of images in your chosen stereo viewing-mode and delete selected ones or copy or move them to a chosen folder. 90014 Automatic Color Adjustment. 90014 Open the contents of two folders in separate, side-by-side windows and synchronously scroll the columns for stereo-comparison. The columns may be single or multiple-image wide. 90014 Embed Exif orientation tag in any JPG image (digicam or scanned film) from twinned cameras 90014 Correct Loreo ‘Lens-in-a-cap (LIAC)’ images.90014 Add / Delete or restore a thumbnail to existing JPEG images for fast folder preview 90014 An efficient Batch Processing Workflow allows you to quickly generate numerous stereo formats in various file-types. 90014 Add stereo text (such as a Copyright notice) to individual or batch images and against a colored banner. 90014 Add colored drop-shadow to text for greater visibility with some images 90014 Overlay custom Logo directly on image or on a colored banner-zone and with transparency. 90014 Batch Stereo-Format Conversion 90014 Add tricolor borders to Save’d images in a different style to screen borders 90014 Batch generation of stereo images from alignment-corrected browsed images.90014 Multi-rename all or selected image files in a folder 90014 Full renaming of digital camera files with option to retain original frame-number 90006 90005 Slide-Show Script automatically created using images from current folder 90014 Create a custom slide-show with mixed stereo-formats and optional sound 90014 Create a runtime slide-show package that users can easily start with a click of the mouse 90006 90005 Print your image actual-size or fitted-to-paper and automatically centered. 90014 Add tricolor borders to the printed image in a different style to screen borders 90014 Print (or save) stereo cards in custom-format or ‘Classical’ (Victorian round-top frame and sepia toning if desired).90014 Stereo-card images saved-to-disk may be printed as standard sizes (4×6, 4x7inches) by photo labs. 90014 These will be suitable for Argus / Loreo and Holmes viewers. 90014 Print multiple cards on a single sheet, mixing custom and classic if desired. 90014 Print multiple images in various stereo-formats on a single sheet, including stereo cards if desired. 90014 Canvas size feature allows you to save stereo-card image of defined size for later printing. 90014 This allows you, for example, to print a 6 «x4» card even if your printer does not support that paper size.90014 The entire fullpage background may be in a chosen color, not just the stereo-card background. 90006 90005 Capture stereo Google Earth images. 90014 Add geographical data to image EXIF tag and jump to that location in Google Maps or Google Earth. 90014 Up to 100 Undo / Redo operations. 90014 Create wiggle / wobble Animated GIF’s for unaided viewing and not requiring free-viewing ability. 90014 Save BMP, GIF, animated GIF, TIF and PNG images with reduced colors to lessen file-size. 90014 Rename images, retaining original numeric index if desired.90014 Display file properties and copy to clipboard. 90014 Customize the initial, stereo, single-image or image file-list toolbars. 90014 Add / Remove ‘Open with SPM’ to Internet Explorer’s anchor and image context menus. 90014 Creation of WebPages that use ‘StereoPhotoViewer Applet’ to display slideshows in a popup window or embedded in the page. 90014 Fast preview of folder images as thumbnails and option to copy, move or delete selected images to existing or new folder. 90014 Create an HTML file with Java Applet Stereo-Viewer support.90014 Create a stereo image for your NTT DoCoMo Sh351is and SH505i mobile phones 90014 Run an external programme to edit your images and then return them to SPM 90014 Copy and Paste images to and from external applications 90014 etc … 90006 90005 90008 Operating System 90009 90014 Windows98SE / Me / 2000 / XP 90006 90005 90008 Supported Image File Types 90009 90014 JPEG / BMP / TIFF / PNG / GIF / Susie Plug-in 90006 90005 90008 Screen Shot; 90009 90006 90005 Main Window 90014 90006 90005 Easy Adjustment Dialog 90014 90006 90005 90008 Licence for ‘StereoPhoto Maker’ 90009 90014 ‘StereoPhoto Maker’ is Freeware and may not be included with any commercial products.90014 Licenses are not issued and distribution on CD is not permitted. 90014 Customised versions for commercial use are not available. 90014 You use the software at your own risk and no responsibility is taken for damage to person, software or hardware. 90014 90008 Masuji SUTO 90009 90006 .90000 6 Tips for Widening the Stereo Image of a Mix 90001 90002 90003 This article references previous versions of Ozone. Learn about the latest Ozone and its powerful new features like Master Rebalance, Low End Focus, and improved Tonal Balance Control by clicking here. 90004 90005 90002 Getting stereo imaging right is no easy task. Just when you think you’ve achieved wonderous mix width, you pull up a reference track and find that your music seems narrow in comparison.Worse yet, when you fold your mix into mono it shrinks down even further. 90005 90002 That’s why we’re offering up six stereo imaging tips, with consideration for genre, song structure, and mono compatibility. Try these tips yourself with our free imaging plug-in-Ozone Imager. 90005 90010 90011 1. Consider why you’re making changes to the stereo image 90012 90013 90002 Before you pan and «stereoize» every track in your mix for the sake of it, think about why you’re making these moves first.Should the doubled vocal surround the listener in the chorus? What about the synth track? Or does it make more sense for the double-tracked guitars to take over? Should the snare stay in the center for punch? Or is it better suited slightly off to the side so the kick drum is the main focus? 90005 90002 There are a number of factors that influence how we approach stereo imaging. Genre is one-by tradition, many styles of rock use LCR panning to bring size and definition to walls of guitars. Instrument type is another-some sounds, like bass, simply do a better job in the center.And sometimes, you just want to create a cool effect that wows listeners. 90005 90002 No matter the reason, when you know why you are doing what you’re doing, it becomes easier to make decisions. 90005 90010 90011 2. Pan on monitors to impact the stereo image 90012 90013 90002 Thanks to an acoustic process called crossfeed, sounds that come out of the left speaker in a stereo setup are heard by our right ear and vice-versa. Put some headphones on and you’ll find that crossfeed no longer exists.The left and right channel are fully separated and hard-panned sounds only occur on one side of the mix. 90005 90002 This makes it a greater challenge to judge panning decisions and identify phase issues with headphones. What sounded wide, but cohesive on monitors an hour ago is now tugging at the back of your ears! In search of relief, you may undo all the great panning work you did and move sounds back toward the center, resulting in a narrow mix. 90005 90002 If you do not find the lack of crossfeed a nuisance and can achieve impressive mix width on headphones, more power to you.Otherwise, investing in a pair of neutral monitors will serve you well for panning and much more. Get tips for panning in the video below using the free Visual Mixer plug-in: 90005 90002 90031 90032 90005 90010 90011 3. Use a stereo imager like Ozone Imager 90012 90013 90002 One of the more obvious ways to increase mix width is with an imaging plugin, like iZotope’s very own Imager, which comes with Ozone.90005 90002 You can use Ozone Imager to add space to a narrow vocal track in the center or push already-panned elements (like drum overheads) beyond the apparent edges of monitors. When there is a general frequency area to widen, rather than a specific instrument, some engineers will apply imaging on the master channel. Give this a shot if you’re curious, just be sure to keep processing light to maintain a natural sound. 90005 90042 90002 Ozone Stereo Imager 90005 90002 The four EQ bands on the right side of Ozone’s Imager offer flexibility when widening frequency-rich instruments.If you widen the entire signal of a square wave synth, the bass might be phasey and even drop out when summed to mono (more on that later). By keeping the bass frequencies narrow and widening just the top-end, you’ll give the illusion of a wide mix without comprising the song’s ability to translate. 90005 90002 You will quickly discover that most signals (at least, in solo) sound better a little puffed up. But like all things in music production and mixing, stereo imaging can be overdone, which leads us to the next point … 90005 90010 90011 4.Do not widen all the time, widen with contrast in mind 90012 90013 90002 Just as you need a mix of dry and wet sounds to achieve mix depth and a combination of loud and soft elements for apparent dynamic range, you need a balance of narrow and wide signals for a mix to appear wide. Without any narrow signals, the listener has no point of reference for width. 90005 90002 In fact, if every track is stretched to its limits, your mix will sound pretty weird and hollow. You’re better off widening mix elements based on a principle of contrast.A few ideas include: 90005 90002 To enhance the power of a chorus, keep the verse narrow and widen just one or two elements as the song reaches its emotional peak, repeating this pattern throughout. Your wide element can be a vocal double, modulated guitar, or drums. 90005 90002 Hard pan two rhythmically opposed tracks-like percussion or guitars-to avoid weighing down one side. Executed well, this can create a «call-and-response» interaction between the tracks that makes the stereo field exciting.90005 90002 In a dense rock mix, introduce contrast between panned guitar doubles and quadruples with distortion, amp emulations, or EQ. This will maintain the larger-than-life feel while creating some difference between the guitars so it’s not just a huge wash of sound. If possible, capture some of this variation during recording-use a close room mic for a thick guitar sound first, then a more ambient mic for the double. 90005 90002 Have you ever received a mix with too many wide stereo parts that are muddying the stereo image? If your ears are losing focus and your mix is losing clarity, collapse those huge stereo tracks-pianos and other keyboard parts come to mind-into mono and pan them off to the sides.By reducing the competition for frequency space you can make the mix feel wider, or at least prevent it from becoming too narrow. 90005 90010 90011 5. Automate your pans with auto-panners 90012 90013 90002 One of my favorite «hands-off» mixing techniques is auto-panning, which does what its name implies: automated panning moves. On a static electronic hi-hat pattern, why not add a little stereo movement to keep things interesting-like Post Malone producer, Tank God, did in «Rockstar»? 90005 90002 This same song has a chopped vocal effect-try words «damn» and «get in» in the first verse-which can be emulated with an auto-panner set to 32nd notes.Listen to this effect on repeats of the word «me» below (and excuse the suggestive lyrics): 90005 90002 It’s a simple, but creative way to add some rhythmic interest to the stereo field. By processing only certain words, it also plays into the strategy of widening for contrast. A bit of this effect now and then is going to get people’s attention but tire them if used for three minutes straight. 90005 90010 90011 6. Can a mix’s stereo image be too wide? 90012 90013 90002 As I touched on earlier, widening and other stereo effects can be overdone.With beyond-the-speakers wide tracks, some stereo information is usually lost to phase issues when the mix is summed to mono. A drop in level, thinning, and even total cancellation are all possible depending on the source material and stereo position. 90005 90002 But in an age where few people listen to music in mono, why would anyone bother with mono compatibility in the first place? There’s the argument that many public spaces, like clubs and retail stores, use mono PA systems, but this can fail to connect with mixers who are not doing pop music at a commercial level.90005 90002 More importantly, I think, is the fact that most smartphones use mono. Even if you listen with newer models that have stereo playback, you’ll find the image is still one-dimension due to the close spacing of the two speakers. This argument makes more sense for up-and-coming artists who share their music on SoundCloud and Spotify. How likely is the virality of a song if it does not slap on iPhones? 90005 90002 Ultimately, a mix that sounds good in mono ensures a solid translation regardless of the playback device and listening environment.At house parties, few people are going to be standing perfectly in the middle of the speaker setup. It’s unlikely the speakers are even arranged for optimal listening anyway. I’ve been to many impromptu gatherings where one speaker is on a stand and the other is positioned a foot lower on a coffee table or higher up on a bookshelf. Stereo sound begins to lose its value right there. 90005 90002 I like to think of mono as a quality assurance check for the sounds in my mix. If I’ve relied too much on panning and other width tricks to improve my mix, this becomes clear when I hit the mono switch and the whole song shrinks.Going back to the wimpy sounds and making the changes I need to improves the mix. 90005 90010 90011 Conclusion 90012 90013 90002 Adjusting the width of a sound and finding its ideal position in the stereo field is one of the more fun, but challenging tasks in a mix. Multiple factors-genre, instrument type, mono compatibility, monitoring setup, and more-need to be taken into account. 90005 90002 I hope this article has given you some actionable width tips for your mix, along with some mistakes to watch out for.90005 .