Создаем реалистичную печать в фотошоп
Такие печати вы наверняка видели на некоторых сайтах или блогах. Они являются ничем иным, как забавой. Выглядят они очень натурально, но все же подделать настоящую печать таким способом не пытайтесь  .
.
1. Создайте новый документ белого цвета размерами 300px в ширину и 300px в длину.
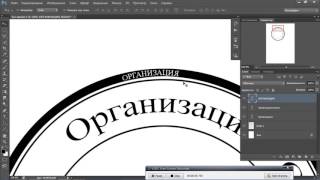
2. Напишите на созданном документе примерно посредине текст черным шрифтом Arial, который будет находится по периферии будущей печати:

3. В настройках инструмента Текст нажмите на значок, отмеченный на скриншоте красным:

и в открывшемся окне выберите стиль деформации текста дугой:

Для этого стиля примените следующие настройки:

4. Теперь дублируйте текстовый слой: Слой (Layer) –> Создать дубликат слоя…(Duplicate Layer…)
и примените команды Редактирование (Edit) –> Трансформирование (Transform) –> Поворот на 180° (Rotate 180°)
сместите текстовый слой так, чтобы получилось так:


5. Для обводки нашей печать создадим новый слой и выберем инструмент “Эллипс” ( Ellitical Marquee tool), его также можно вызвать горячей клавишей U. С помощью эллипса создайте контур вокруг текста. Выберите настройки кисти – диаметр – 5px, жесткость – 100%, цвет – черный. Снова выберите инструмент “эллипс”, кликните в любом месте документа правой кнопкой мыши и выберите строку “Выполнить обводку контура” –> кисть.

6. Создайте подобным образом внутренний контур печати. В настройках кисти поменяйте диаметр на меньший (2 px) и также, как и предыдущий раз обведите контур.

7. Напишите текст, который будет находится во внутренней части будущего оттиска и сдвиньте его точно в центр при помощи инструмента Перемещение (Move Tool).

8. Для того, чтобы оттиск печати получился более правдоподобным следует наложить любую черно-белую текстуру и поменять режим смешивания слоев. Для примера мы можем быстро создать текстуру сами. Для этого создайте новый слой. Примените команды Фильтр (Filter) –> Рендеринг (Render) –> Облака (Clouds). Добавим шум: Фильтр (Filter) –> Шум (Noise) ->Добавить шум (Add Noise):

9. Меняем режим смешивания слоев (Blending mode) на Осветление (Screen). Последний штрих – объединяем слои (Слой –> Выполнить сведение…) и повернуть изображение, применив команды Редактирование (Edit) – Трансформирование (Transform) – Поворот (Rotate).

Создание реалистичной печати в фотошопе
Как сделать печать в фотошопе и каким кодом должен быть цвет.
Открываем новый документ в фотошопе, создаём новый слой (cntrl + shift +N). Для того чтобы нарисовать круг я использую инструмент: «эллипс».
У этого способа такой принцип получения ровного круга — зажимаем клавишу shift (для ровного круга). Далее кликаем в слоях по нашему эллипсу правой кнопкой мыши и выбираем пункт растрировать слой. Двумя шелчками по слою в правой панели открываем стиль слоя и делаем обводку отличающимся цветом от эллипса, потом вышеуказанным способом нажимаем растрировать стиль слоя. После чего эллипс можно удалить «волшебным ластиком», останется только обводка. Добавляем картинку (не стоит подделывать гербовую печать т.к. это грозит лишением свободы до трех лет). Поэтому добавляем лицо гуманоида, полагаясь на «авось» и надеясь что культура внеземной расы не покарает вид подобного плагиата.
Добавление текста в печать.
Сделать печать в фотошопе https://foto248.ruСоздаём новый слой. Пишем текст и деформируем его дугой. Деформация есть в верхней панели. Так-же её можно сделать нажав правой кнопкой мыши на текст и выбрать пункт «деформация текста». Углы можно подправить нажатием на текст с зажатой клавишей «ctrl», текст при этом должен быть в режиме редактирования. Для более полной правдоподобности можно использовать пластику. Фильтр -> пластика или shift+ ctrl + X
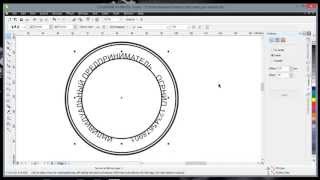
Еще для печати можно использовать специально круговой текст, читайте по этой ссылке.
Круговой текст даже удобнее чем деформация, т.к. избавляет от лишних манипуляций и его можно симметричным используя два полукруга.
Эффекты шума и неполного пропечатывания.
Добавление шума:
Фильтр -> шум -> добавить шум.
Если нужно удалить лишний цвет в нашем случае все кроме синего. Заходим в — изображение -> Коррекция -> цветовой тон/насыщенность в открытом окошке выбираем цвет и удаляем в нем яркость или насыщенность, или просто заменяем его на другой.
Неполное пропечатывание можно сделать с помощью ластика уменьшив жесткость или размер области стирания. Так-же использовать черно белый градиент. Для этого нажимаем букву «Q» для создания быстрой маски. заливаем градиентом изображение. Выходим из быстрой маски нажатием буквы «Q». Часть изображения должна получится обведенной выделением. Копируем или вырезаем изображение. Вставляем на новый слой.
Код цвета можно подобрать специальным плагином для подбора цвета ColorZilla, в данном случае синей цвет на печати имеет код #170de1 . Рекомендую использовать плагин, потому что он невероятно прост и интуитивно понятен, с ним не придется перебирать цвета, а можно выбрать один из любой открытой страницы или картинки. Цвет сохраниться в выпадающем меню с параметром колор пикер.
В этом уроке вы узнаете, как за несколько простых шагов создать интересный эффект реалистичной печати в Фотошоп.
Rubber Stamp Generator

1. Создаем гранж-фон
Шаг 1
Создаем новый документ размером 850 х 550 пикселей (Ctrl+N). Можете взять другой размер, но тогда вам придется пропорционально подкорректировать все размеры, которые мы будем использовать в уроке.
Вставляем на новый слой текстуру бумаги.

Шаг 2
Далее переходим Layer — New Adjustment Layer — Gradient Map (Слой — Новый корректирующий слой — Карта градиента), кликаем по градиентной полосе, чтобы открыть редактор, и устанавливаем цвета #7a6849 и #fffbf7.

2. Создаем основу штампа
Шаг 1
Активируем инструмент Ellipse Tool (U) (Овал) и рисуем окружность. Во время работы удерживайте клавишу Shift, чтобы сохранить пропорции. Называем слой с фигурой «Круг 1».

Шаг 2
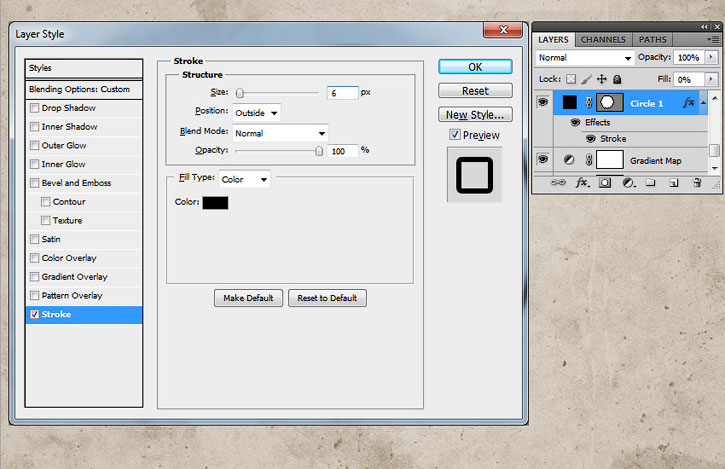
Три раза дублируем (Ctrl+J) слой «Круг 1». Каждую копию называем «Круг 2», «Круг 3» и «Круг 4».

Уменьшаем Fill (Заливка) слоя «Круг 1» до 0%. Затем дважды кликаем по этому слою, чтобы открыть окно Layer Style (Стиль слоя), и применяем Stroke (Обводка). Ширину обводки устанавливаем на 6 пикселей, а цвет — на #000000.

Шаг 3
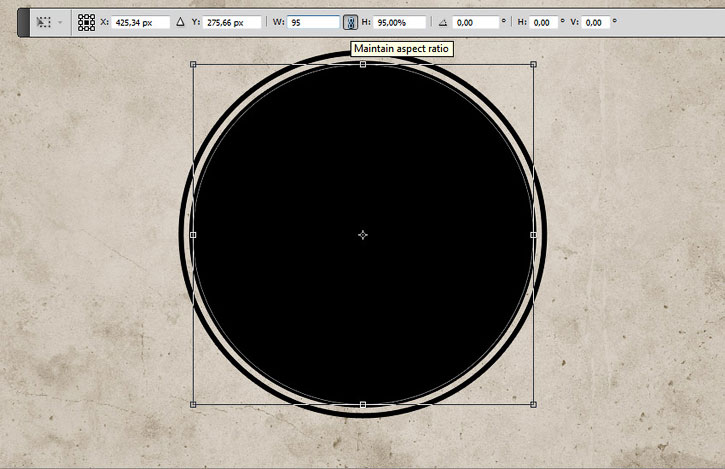
Выбираем слой «Круг 2» и жмем комбинацию Ctrl+T, чтобы активировать свободную трансформацию. На верхней панели нажимаем кнопку со звеньями цепи, чтобы сохранить пропорции, и устанавливаем масштаб на 95%.
Fill Stroke

Шаг 4
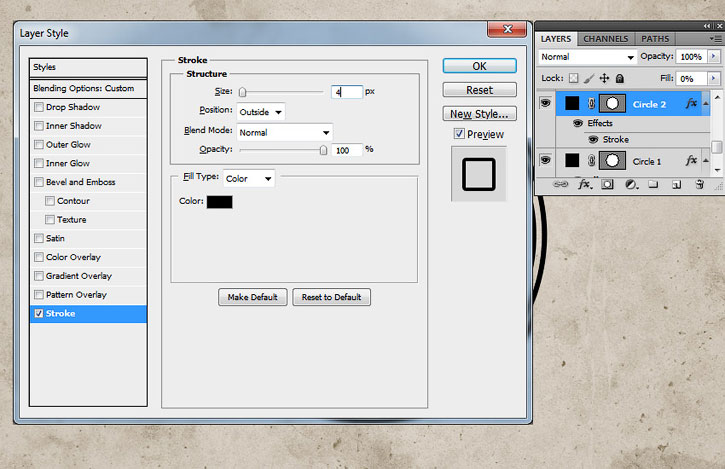
Выбираем слой «Круг 3» и жмем комбинацию Ctrl+T, чтобы активировать свободную трансформацию. На верхней панели нажимаем кнопку со звеньями цепи, чтобы сохранить пропорции, и устанавливаем масштаб на 75%.

Для этого слоя уменьшаем Fill (Заливка) до 0% и применяем стиль слоя Stroke (Обводка). Ширина обводки — 6 пикселя, цвет — #000000.

Шаг 5
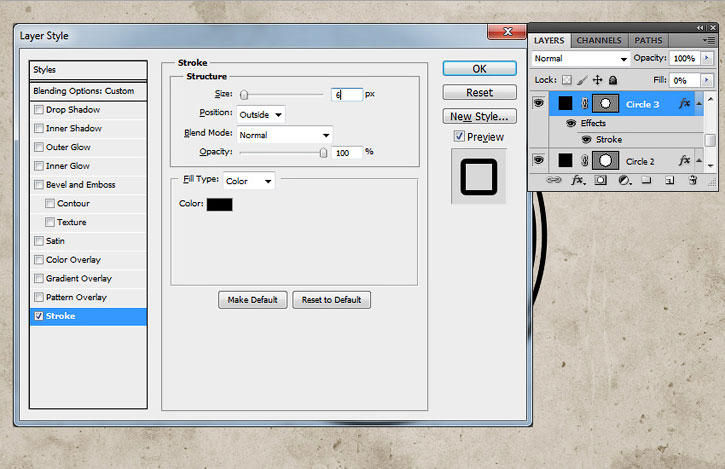
Выбираем слой «Круг 4» и жмем комбинацию Ctrl+T, чтобы активировать свободную трансформацию. На верхней панели нажимаем кнопку со звеньями цепи, чтобы сохранить пропорции, и устанавливаем масштаб на 70%.

Для этого слоя также уменьшаем Fill (Заливка) до 0% и применяем стиль слоя Stroke (Обводка). Ширина обводки — 4 пикселя, цвет — #000000.


Шаг 6
Далее загружаем круглые фигуры и устанавливаем их в Фотошоп. Для этого переходим Edit — Preset Manager (Редактирование — Управление наборами), в выпадающем списке Preset Type (Тип набора) выбираем Custom Shapes (Произвольные фигуры). Затем нажимаем кнопку Load (Загрузить) и в появившемся окне находим скачанный CSH-файл.
Устанавливаем цвет на #000000. Активируем Custom Shape Tool (U) (Произвольная фигура), на верхней панели в настройках инструмента устанавливаем Defined Proportions (Сохранить пропорции). Выбираем любую окружность и рисуем ее по внешнему контуру штампа. В данном уроке использована фигура 17.

3. Добавляем текст
Кликаем по миниатюре маски слоя «Круг 3». Затем берем Horizontal Type Tool (T) (Текст), подводим курсор к контуру окружности, пока не появится символ | с волнистой линией рядом. Кликаем по контуру и печатаем текст.
В уроке использован шрифт Intro и цвет — #000000. Но вы, как обычно, можете подобрать свои шрифты и настройки.

4. Превращаем фото в печать
Шаг 1
Переносим на рабочий документ фото модели.

Шаг 2
Зажимаем клавишу Ctrl и кликаем по маске слоя «Круг 4», чтобы загрузить ее выделение.

Переходим в нижнюю часть панели слоев и нажимаем кнопку Add layer mask (Добавить слой-маску), чтобы применить маску к слою с моделью.


Шаг 3
Применяем фильтр Filter — Sketch — Stamp (Фильтр — Эскиз — Линогравюра). Light /Dark Balance (Тоновый баланс) устанавливаем на 4, а Smoothness (Смягчение) — на 1.


Шаг 4
Дважды кликаем по слою с моделью и в появившемся окне Layer Style (Ст
Видео:
🔷Плей лист с заданиями 1-40+ по курсу «Фотошоп с нуля до профи (Photoshop) Уроки-курс» : …
Рассмотрим ситуацию если вам нужно быстро перенести печать с отсканированного документа на ваш нужный.
В этом видео я покажу как сделать штамп в фотошопе. Простой урок для начинающих о том как создать круглы
В этом видео я покажу как сделать текст по кругу в фотошопе. Простой урок для начинающих как написать те
Здесь описан способ создания печатей в программе Photoshop.

Ставим свой штамп любого вида и в любой документ. Все действие занимает несколько минут, а эффект превос
Серия уроков о том, как нарисовать печать в Corel Draw (Корел Дроу). Урок 1 — Рассказывает как в мельчайших…
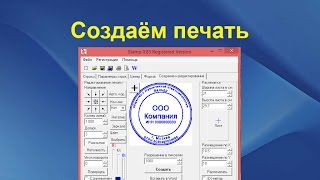
Создаем печать в программе | Скачать бесплатно программу полная версия ru/print_routine_and_a_stamp.

Очень часто наши ученики нам задают такой вопрос, после того как начинают работать самостоятельно. Мы п
приношу извинения за качество видео в 240р, несколько раз перезаливал видео, и каждый раз ютюб искажает в

В видео показано как подделать печать или подпись при помощи программы Adobe Photoshop. В ролике я попыталс…

⭗ Как создать печать. Как нарисовать. Печати и штампы. Круглая печать. Госты. ▶ Курс по CorelDraw для новичк
Вставляем скан копии печати и подписи в Word 2003, пользуясь только инструментами самого редактора Word! Вста.
Каждый уважающий себя предприниматель должен иметь печать. Без печати не получится заверить докуме…
Как сделать печать в фотошопе !
В данной публикации мы рассмотрим один из инструментов Photoshop – “Штамп”, который активно применяется в процессе обработки изображений для дублирования/переноса определенной области в новое место и т.д. Итак, давайте посмотрим, как пользоваться инструментом и настраивать его.
Принцип работы со “Штампом”
“Штамп” расположен на панели инструментов слева. Также для его активации можно просто использовать клавишу S.

Разберем использование инструмента на практике. В качестве примера возьмем изображение ниже.

Алгоритм действий после выбора “Штампа” следующий:
- Зажимаем клавишу Alt (указатель мыши при этом должен смениться на мишень) и щелкаем левой кнопкой мыши по области, которую хотим взять в качестве образца (т.е. скопировать).

- Отпускаем клавишу Alt и щелкаем по новому месту, куда следует вставить скопированный участок.
- Чтобы продублировать область большего размера (например, какой-нибудь объект целиком), после взятия образца щелкаем в новом месте, и не отпуская кнопку мыши, продолжаем движение в разные стороны. При этом мы можем заметить небольшой крестик на первоначальном участке/объекте, который поможет понять, куда именно двигать указатель. В нашем случае мы решили продублировать участок с луной (для наглядности удалили нижнюю часть изображения).Примечание: при выполнении данной операции следует учитывать один нюанс – если кнопку мыши отпустить и затем снова щелкнуть ее, копирование начнется заново с взятого в качестве образца участка. Если включить опцию “Выравнивание”, процесс копирования будет зависеть от местоположения указателя мыши относительно исходного участка.


 Примечание: при выполнении данной операции следует учитывать один нюанс – если кнопку мыши отпустить и затем снова щелкнуть ее, копирование начнется заново с взятого в качестве образца участка. Если включить опцию “Выравнивание”, процесс копирования будет зависеть от местоположения указателя мыши относительно исходного участка.
 Продублировать участок можно и на другом слое. Для этого сначала берем образец на исходном слое, затем переключаемся на тот, который нужен, и выполняем требуемые действия.

Параметры инструмента
Теперь, когда мы разобрались с тем, как выбрать и использовать “Штамп“, давайте рассмотрим его параметры, которые напоминают настройки “Кисти” (подробнее ознакомиться с ней вы можете в нашей публикации – “Инструмент “Кисть (Brush)” в Фотошопе”).
Итак, основные настройки “Штампа” следующие:
1. Размер, жесткость и форма

Задать размер и жесткость можно как с помощью ползунка, так и введя требуемые значения в специальных полях. Форму (чаще всего, круглая) выбираем с помощью щелка по нужному варианту или клавиш “вверх/вниз” на клавиатуре. При выставлении жесткости следует учитывать, что чем больше ее значение, тем четче получатся края скопированного участка.
2. Режим

В данном случае речь идет о том, какой режим наложения будет применен для продублированной области (как она будет накладываться на уже имеющееся изображение в новом месте/слое).
3. Непрозрачность и нажим

Непрозрачность позволяет установить степень видимости копируемого участка, нажим – интенсивность инструмента.
4. Образец

Здесь мы указываем, как именно будет браться образец. На выбор предлагается 3 варианта:
- с активного слоя;
- с активного слоя и ниже;
- со всех слоев.
5. Дополнительные параметры
Эффекты аэрографа
 Включение данных эффектов позволяет имитировать работу настоящим аэрографом (распылителем краски).
Выравнивание
 Настройка уже была рассмотрена нами в первом разделе.
Заключение
Таким образом, мы разобрали основной принцип работы со “Штампом” в Фотошопе. При умелом использовании данный инструмент станет незаменимым помощником графического редактора, заметно упростив процесс обработки изображений в программе.
90000 Photoshop Stamp Effect — Photoshop tutorial 90001 90002 How To Make A Stamp From An Image In Photoshop 90003 90004 First open in a new PSD file the photo that you want to transform into stamp. I have choosen my own blog mascot but it looks just as beautiful with any other image. Call this layer Photo Layer. 90005 90004 90005 90002 How To Make The Postage Stamp Border in Photoshop 90003 90004 I will start creating the Photoshop stamp effect by making the stamp border.Add a simple 1px 90011 # 907e60 90012 border to this photo. Open the layer style window and check 90013 Stroke 90014, 1px, outside and the color, as I’ve said, is 90011 # 907e60 90012. 90005 90004 90005 90004 With the 90013 Rectangle Tool 90014 draw a white shape like in the image, call it Photo Frame Layer. Select the two layers and with the Move Tool selected press Align Vertical Center and Align Horizontal Centers so that you center the two layers.Merge the two layers and call the new layer, Stamp Layer. 90005 90004 90005 90004 Add some text that describes the stamp. I have choosed 90013 Georgia Font 90014 Family but you can always search for a 90013 stamp font 90014 on the internet. Select the Stamp Layer and all the Text Layers and merge the. You have to rasterize the text layers first otherwise the Merge will not work. 90005 90004 90005 90002 Make the Postage Stamp Perforations on the Border 90003 90004 Now comes the step where we turn the photo into a stamp.90005 90004 Usually, multiple postage stamps are printed on large sheets of paper. Then using a tool for making stamp perforations the stamps are easily separated one from another. That’s where the postage stamp perforations (little holes on the border of the stamp) come from. 90005 90004 Let’s make our own stamp perforations using Photoshop. 90005 90004 Select the 90013 Eraser Tool 90014, choose a 90013 Hard Round Brush 90014, size 15px. 90005 90004 90005 90004 Toggle the Brush Panel, select 90013 Brush Tip Shape 90014 and set the 90013 Spacing 90014 to 167% just like in the image.90005 90004 90005 90004 Be sure you have the 90013 Eraser Tool 90014 and the Stamp Layer selected. Press 90013 SHIFT 90014 and simply draw a line around the edges of the stamp. The 90013 SHIFT 90014 pressed will help you draw straight lines in Photoshop (TIP: check out my detailed tutorial on how to draw lines in Photoshop including how to draw perfect straight lines in Photoshop). You should know that you can not make this border with a single move.You have to make 4 different lines with the Eraser Tool. 90005 90004 Another method, much faster, is to use 90013 Work Paths 90014. Press CTRL and click the tumbnail of the Stamp Layer. Now the Stamp is selected. With the Restangular Marquee Tool selected right click on the selection and choose 90013 Make Work Path 90014. 90005 90004 90005 90004 Make sure you have the Eraser Tool selected. Go to the 90013 Path Tab 90014 and right click on the Work Path and choose 90013 Stroke Path 90014.You will obtain a beautiful stamp effect. 90005 90004 90005 90004 If you would like to learn more about this technique, I’ve written an extensive guide about Stroke Path in Photoshop with lots of examples of what you can do with it, so check it out. 90005 90002 Finish the Photoshop Stamp Effect — Apply a Rubber Stamp on Top of the Postage Stamp 90003 90004 So the stamp is now looking good. For more imapct open the Layer Style Window and add Drop Shadow (black, multiply, 35%, angle 120, distance 3, spread 0 and size 2 px) 90005 90004 90005 90004 To make the stamp effect more realistic I will apply a rubber stamp on the postage stamp.For that make another blank layer and call it 90013 Stamped Effect 90014. We will use 90013 Work Path 90014 to create a nice realistic rubber stamp. 90005 90004 90005 90004 Select the 90013 Brush Tool 90014 and choose a 9px hard round brush, color black. Return to the Work path and choose 90013 Stroke Path 90014 like in the previous step, but this time, instead of 90013 Eraser Tool 90014 we will use the 90013 Brush Tool 90014.90005 90004 90005 90004 A rubber stamp usually has concentric circles. It’s very easy to make concentric circles in Photoshop: 90005 90004 Resize the Work Path (90013 CTRL + T 90014) to 50% and reapeat the same procedure to obtain two black 90013 outlined circle 90014. 90005 90004 90005 90004 Create a new layer, called 90013 Black Lines 90014 and draw several black horizontal lines with the Brush Tool.If you do not know how you can check out my tutorial on Hot to Draw Parallel Lines In Photoshop. 90005 90004 90005 90004 With the Black Lines layer selected go to 90013 Filter 90014, 90013 Distort 90014 and choose 90013 Waves 90014 with the following settings. You will obtain beautiful 90013 curved lines 90014. 90005 90004 90005 90004 Resize the both layers and change their blending mode to 90013 Dissolve 90014.Merge the two layers under one layer called Stamp Effect. 90005 90004 90005 90004 To remove the areas that exceed the stamp simply select the Photo Stamp Layer (press CTRL and click the Photo Stamp Layer thumbnail). Select the Stamp Effect Layer and press 90013 Add Layer Mask 90014. Now you see that a part from the stamp effect is now hidden. 90005 90004 90005 90002 How to Make a Vintage Postage Stamp Effect in Photoshop 90003 90004 For the final touches you can use the 90013 Eraser Tool 90014, spatter default brush and erase parts of the stamp effect and lower the opacity of the layer to 80%.If you do not want to create the stamped effect yourself you can use one of the many Photoshop Stamp Brushes available for free on the internet 90005 90004 To obtain a 90013 vintage stamp 90014 look I have used an old paper mask. You can choose a beautiful vintage old paper. You can now create your own customized envelope stamps, stamp icons and so on, using the power of Photoshop. 90005 90004 90005 90004 All our registered users can download the 90013 stamp PSD file 90014 for free.90005 90013 DOWNLOAD! (1.07MB) 90014 90002 You Might Also Like 90003 90004 If you’re looking for a different Photoshop stamp effect, check out my other tutorial on how to make Custom Postage Stamps. 90005 90004 Also, here are some 90013 premium resources 90014 that you might want to try to create a great stamp effect customized and unique. Download the 90013 vector postal stamps 90014 in PSD fully layered formatand also the great 90013 rubber stamp generator 90014.90005 .90000 How To Make Your Own Custom Photoshop Brushes 90001 90002 Step 1: Create A New Photoshop Document 90003 90004 Let’s begin by creating a brand new Photoshop document which we’ll use to design our brush. Again, the purpose of this tutorial is not to learn how to create this exact brush, but rather to see how the process works from beginning to end. I’m going to create a new 200 x 200 pixel document by going up to the 90005 File 90006 menu in the Menu Bar at the top of the screen and choosing 90005 New 90006.Or, for a faster way to create a new document, press 90005 Ctrl + N 90006 (Win) / 90005 Command + N 90006 (Mac) on your keyboard: 90013 90014 90014 90004 Go to File> New. 90013 90004 This opens the New Document dialog box. Enter 90005 200 90006 for both the 90005 Width 90006 and 90005 Height 90006 options and make sure the measurement type is set to 90005 pixels 90006. Also, make sure the 90005 Background Contents 90006 option is set to 90005 White 90006 since we need white to be the background color for the brush: 90013 90032 90032 90004 Create a new 200 x 200 pixel document with a white background.90013 90004 Click OK when you’re done to accept the settings and exit out of the dialog box. A new 200 x 200 pixel document, filled with white, will appear on your screen. 90013 90004 90005 Choosing An Initial Size For Your Brush 90006 90041 Photoshop allows us to create brushes as large as 2500 x 2500 pixels, but as they say, just because you can does not mean you should. At that size, you’d be painting with the virtual equivalent of a floor mop. Also, painting with very large brushes requires a lot more memory and horse power from your computer which can slow your system down considerably.For typical work, you’ll want to create brushes much smaller. 90013 90004 The size at which you initially create the brush will become its default size, and it’s important to note that brushes we create ourselves are 90005 pixel-based 90006 brushes, which means they’re essentially images and behave exactly the same way as regular images when it comes to resizing them. Brushes will usually remain crisp and sharp when we make them smaller, but if you increase their size much beyond the default, they’ll become soft and dull looking.The general idea, then, is to create your new brush just large enough to suit your needs, which may involve a little trial and error. The 200 x 200 pixel size I’m using here usually works well. 90013 90002 Step 2: Select The Brush Tool 90003 90004 Let’s create our new brush using one of Photoshop’s built-in brushes. First, select the 90005 Brush Tool 90006 from the Tools palette, or press the letter 90005 B 90006 on your keyboard to quickly select it with the shortcut: 90013 90055 90055 90004 Select the Brush Tool.90013 90002 Step 3: Select A Small Round Brush 90003 90004 With the Brush Tool selected, 90005 right-click 90006 (Win) / 90005 Control-click 90006 (Mac) anywhere inside the document window to display the 90005 Brush Preset picker 90006, which is a miniature version of the full-blown Brushes panel that we’ll look at a bit later (and we’ll examine in much more detail in another tutorial). The Brush Preset picker allows us to choose from a list of preset brushes (which explains its name).To select a brush, simply click on its thumbnail. I’m going to click on the Hard Round 5 Pixels brush to select it. If you have Tool Tips enabled in Photoshop’s Preferences, the name of each brush will appear as you hover over the thumbnails. Press 90005 Enter 90006 (Win) / 90005 Return 90006 (Mac) once you’ve chosen your brush to close out of the palette: 90013 90073 90073 90004 Select a small round brush from the Preset picker, then press Enter (Win) / Return (Mac) to close out of it.90013 90002 Step 4: Make Sure The Foreground Color Is Set To Black 90003 90004 Back when we created our new document in Step 1, we made sure to set the background color of our document to white. The reason is that all brushes in Photoshop are Grayscale, meaning that a brush can contain only black, white, or shades of gray in between. Areas filled with white become transparent, so you will not see them when you’re painting with the brush. Areas filled with black will be 100% visible, and if your brush includes various shades of gray, those areas will be partially visible depending on how close they are to black or white, with darker shades of gray being more visible than lighter shades.90013 90004 If we were to turn our new document into a brush as it is right now, the entire brush would be transparent since it contains nothing but white. Painting with an invisible brush may make an interesting statement artistically, but for more practical purposes (like this tutorial), you’ll most likely want a brush you can actually see, which means we’ll need to add some areas of black to the document. The black areas will become the visible shape of the brush (known as the 90005 brush tip 90006).90013 90004 Photoshop paints using the current 90005 Foreground color 90006, and as luck would have it, the default for the Foreground color is black, which means there’s a very good chance yours is already set to black. You can see the current Foreground and Background colors by looking at their color swatches near the bottom of the Tools palette (the Foreground color is the swatch in the top left). If your Foreground color is set to something other than black, press the letter 90005 D 90006 on your keyboard to quickly reset both the Foreground and Background colors to their defaults: 90013 90091 90091 90004 The Foreground color is the color the brush will paint with.90013 90002 Step 5: Paint A Series Of Horizontal Brush Strokes Inside The Document Window 90003 90004 With the small round brush selected and black as your Foreground color, click inside the document window and paint a series of short horizontal brush strokes. For added variety, alter the thickness of the strokes by changing the size of the brush using the handy keyboard shortcuts. Press the 90005 left bracket key 90006 (90005 [90006) to make the brush smaller or the 90005 right bracket key 90006 (90005] 90006) to make it larger.You’ll find the bracket keys to the right of the letter P on most keyboards. When you’re done, you should have a column of brush strokes that looks something like this: 90013 90107 90107 90004 A column of messy, random brush strokes. 90013 90002 Step 6: Create A New Brush From The Document 90003 90004 To create a new Photoshop brush from the document, simply go up to the 90005 Edit 90006 menu at the top of the screen and choose 90005 Define Brush Preset 90006 from the list of options (depending on which version of Photoshop you’re using, the option may be called simply Define Brush): 90013 90119 90119 90004 Go to Edit> Define Brush Preset.90013 90004 Photoshop will pop open a dialog box asking you to give your new brush a name. I’m going to call mine «My New Brush». You’ll probably want to choose a name that’s a little more descriptive: 90013 90125 90125 90004 Name the new brush. 90013 90004 Click OK when you’re done to close out of the dialog box, and that’s all there is to it! We’ve successfully created a brand new custom brush in Photoshop that’s ready and waiting to help us bring our creative vision to life. You can safely close out of the brush’s document at this point.90013 90004 To select the new brush any time you need it, first make sure you have the Brush Tool selected, then 90005 right-click 90006 (Win) / 90005 Control-click 90006 (Mac) anywhere inside your document to open the 90005 Brush Preset picker 90006. Scroll down the list of available brushes until you see your brush thumbnail (newly created brushes will appear at the bottom of the list), then click on the thumbnail to select the brush. Press 90005 Enter 90006 (Win) / 90005 Return 90006 (Mac) once you’ve selected it to close out of the Brush Preset picker: 90013 90143 90143 90004 Select your new brush from the Brush Preset picker.90013 90004 With the new brush selected, simply click and drag inside your document to paint a brush stroke: 90013 90149 90149 90004 The newly created brush in action. 90013 90004 It’s a good start, but I think it’s safe to say that at this stage, my new brush will be of limited use. Fortunately, now that we’ve created a brush tip, we can change and control how the brush behaves as we paint with it using Photoshop’s 90005 Brush Dynamics 90006, found in the main 90005 Brushes panel 90006, which we’ll take a quick look at next! 90013 90002 Step 7: Open The Brushes Panel 90003 90004 We’ve seen how to select a basic, ready-made brush using the Brush Preset picker, but if want more control over how our brush behaves, we need Photoshop’s main 90005 Brushes panel 90006, which gives us full access to some truly amazing options.We’ll save our detailed look at the Brushes panel and all of its controls for another tutorial, but let’s take a quick look at a few ways we can use it to alter the appearance of our brush strokes. 90013 90004 To open the Brushes panel, either go up to the 90005 Window 90006 menu at the top of the screen and choose 90005 Brushes 90006 from the list, or press the 90005 F5 90006 key on your keyboard (press it again to close the panel) , or click on the Brushes panel 90005 toggle icon 90006 in the Options Bar (click it again to close the panel): 90013 90175 90175 90004 The toggle icon in the Options Bar opens and closes the Brushes panel.90013 90004 This opens the main Brushes panel, the big brother of the Brush Preset picker we saw earlier. By default when you first open the Brushes panel, the 90005 Brush Presets 90006 option is selected in the top left corner of the panel, which displays the same small brush icons along the right that we saw in the Brush Preset picker. To select a brush, simply click on its icon. Scroll down the list to your newly created brush and click on its icon to select it if it’s not selected already.The very bottom of the Brushes panel displays a preview of what the brush stroke currently looks like. Since I have not made any changes yet, the preview looks exactly the same as the brush stroke I painted a moment ago: 90013 90183 90183 90004 The main Brushes panel in Photoshop set to the Brush Presets option. 90013 90002 Step 8: Adjust The Brush Tip Spacing 90003 90004 Click on the words 90005 Brush Tip Shape 90006 directly below the Brush Presets option in the top left corner of the Brushes panel: 90013 90193 90193 90004 Click on the Brush Tip Shape option.90013 90004 In the real world, if you were to paint with an actual brush, the brush would lay down a continuous coat of paint on the paper, but that’s not how Photoshop works. Instead, Photoshop «stamps» the document with your brush tip as you drag your mouse. If the stamps appear close enough together, it creates the illusion of a seamless brush stroke, but if the stamps are spaced too far apart from each other, the individual stamps become obvious and the brush stroke appears ridged. Depending on the effect you’re going for (like creating a dotted line, for example), you may want a lot of spacing between the stamps, but in most cases, a seamless brush stroke is more desirable.90013 90004 With the Brush Tip Shape option selected in the Brushes panel, we can control the spacing between the stamps with the appropriately-named 90005 Spacing 90006 option at the very bottom of the panel. Spacing is controlled as a percentage of the width of your brush tip, and by default, it’s set to 25%, which means that if the width of your brush tip is 100 pixels, Photoshop will lay down a new stamp every 25 pixels as you drag your mouse: 90013 90203 90203 90004 The Spacing option controls how frequently Photoshop «stamps» the brush tip as you paint.90013 90004 For a smooth brush stroke, this default setting is usually too high. I’m going to lower mine down to around 13%. To lower the Spacing amount, either drag the slider towards the left or enter a specific value directly into the input box. You’ll see the preview of the brush stroke updating to reflect the changes to the spacing: 90013 90209 90209 90004 Lower the Spacing amount for a smoother looking brush stroke. 90013 90004 Now, if I paint a stroke with my brush, it appears smoother because the individual stamps are closer together: 90013 90215 90215 90004 With the brush tip «stamps» being closer together, the stroke appears smoother.90013 90002 Step 9: Select The Shape Dynamics Option 90003 90004 Click directly on the words 90005 Shape Dynamics 90006 below the Brush Tip Shape option we selected a moment ago, which gives us options for dynamically controlling the size, angle and roundness of the brush tip as we paint. Make sure you click on the words themselves. Clicking inside the checkbox to the left of words will turn the options on but will not give us access to their controls: 90013 90225 90225 90004 Click directly on the words «Shape Dynamics».90013 90002 Step 10: Set The Angle Control To «Direction» 90003 90004 The main problem with the look of my brush stroke is that no matter which direction I paint in, those horizontal lines that make up my brush tip remain, well, horizontal. Let’s fix that so the brush tip will follow the direction of my mouse cursor. With the Shape Dynamics option selected, change the 90005 Control 90006 option for the brush tip 90005 Angle 90006 to 90005 Direction 90006. Again, you’ll see the brush stroke preview at the bottom of the panel update to reflect the change: 90013 90239 90239 90004 Change the Control option for the Angle to «Direction».90013 90004 I’ll paint another stroke with my brush, and this time, things look much more natural. The brush tip is following the direction I’m painting in: 90013 90245 90245 90004 A more natural looking brush stroke. 90013 90002 Step 11: Set The Size Control To «Pen Pressure» (Requires Pen Tablet) 90003 90004 If you’re using a pressure-sensitive pen tablet like I am, you can tell Photoshop that you want to control the size of the brush with your pen. With the Shape Dynamics options still selected, change the 90005 Control 90006 option for the brush tip 90005 Size 90006 to 90005 Pen Pressure 90006: 90013 90259 90259 90004 Change the Control option for the Size of the brush to «Pen Pressure» (if you have a pen tablet, that is).90013 90004 With the Pen Pressure option selected, I can easily control the size of the brush stroke on the fly, giving my custom brush an even more natural look: 90013 90265 90265 90004 The size of the brush can now be controlled dynamically with pen pressure. 90013 90002 Where to go next … 90003 90004 Obviously, this is just a taste of the amount of control the Brushes panel gives us over the behavior of our brush, but in just a few short steps, we’ve managed to design and create a brand new custom Photoshop brush from scratch, and we’ve gotten a glimpse of how powerful the various 90005 dynamic brush controls in the Brushes panel 90006 really are.We’ll cover the Brushes panel in much more detail in another tutorial. 90013 90004 And there we have it! Visit our Photoshop Basics section for more tutorials on the basics of Photoshop! 90013 .90000 The Best Way to Use the Clone Stamp Tool in Photoshop 90001 90002 The Importance of the Clone Stamp Tool 90003 90004 The Clone Stamp Tool is one of the most important Tools that Photoshop has to offer. It allows you to copy areas of an image and i very useful for getting rid of Distractions or Skin blemishes. 90005 90004 In this episode we show you how to master the clone stamp tool in Photoshop. You will learn how to navigate the settings and preferences for the Tool. We also show you how we use the tool through several examples.90005 90002 Using the Clone Source Dialog 90003 90004 The Clone Source Dialog is available by going to Window> Clone Source. Here you will see options for Clone Source, Transformation options, as well as Overlay options. We go through each of these options and show you how we set up our Clone Stamp Tool. 90005 90004 Photoshop has the «Show Overlay» option checked by default however we prefer to keep it unchecked. The Overlay can get in the way and is always available by hitting OPTN + SHIFT.90005 90002 Adjusting Clone Stamp Selections 90003 90004 After using the Clone Stamp Tool to cover the lapel microphone there are still some Adjustments that need to be made. It is best to use the Clone Stamp tool on New Layers so you can Transform the selection afterwards. To do this hit CMD + T then right click on the layer. You will be able to rotate, skew, Transform and Warp the selection so it fits with the image better. 90005 90004 After getting the Clone Stamp selection in place we use a great technique to blend Exposures.Some areas of this layer need to be lighter and some need to be darker and we accomplish this using a combination of a Brush Tool set to blending mode «Soft Light» and the «Lock Transparency» Option in the layer dialog; This will allow you to only paint over non-Transparent pixels. 90005 90004 We then paint Black and White over the layer to brighten or Darken it accordingly. 90005 90002 Use Clone Stamp with Different Brushes 90003 90004 Many people think that you are limited to a soft round Brush when it comes to the Clone Stamp tool.The Clone Stamp tool can use any custom Brush the regular Brush Tool can use. Try adjusting your Brush shape or creating your own custom brush to best complete your project. 90005 .90000 How to Round Corners in Photoshop 90001 90002 It might seem strange, but shapes can actually evoke specific feelings in people, which is why conscious design is so important. For example, people tend to prefer round shapes over angular ones, because they’re more inviting and friendly. Even adding rounded edges to a rectangle will make it seem more approachable, and in many cases, it looks better from a design standpoint. Learning 90003 how to round corners in Photoshop 90004 is fairly straightforward, and although there are many methods for achieving the same goal, we’re going to teach you how to do it to an image using vector masks.90005 90006 90002 90003 Need images for your project? 90004 Shutterstock’s impressive collection of more than 70 million images can help! See what our library has to offer. 90005 90006 90012 90013 90002 First, you’ll need to open a new Photoshop project. In the Layers panel, select the Background layer and fill it with black, so you get a better sense of what’s happening to your shapes. Then, drag or load a photo into the project. 90005 90016 90013 90002 Your photo should now show up as its own layer in the Layers panel (look for «Layer 1»).Make sure it’s selected, and then click the «Layer Mask» icon at the bottom of the panel (it looks like a rectangle with a white circle inside of it). Now, you should see a blank thumbnail to the right of the Layer 1 preview thumbnail. 90005 90016 90013 90002 If you click the same «Layer Mask» icon a second time, another preview thumbnail will appear in Layer 1. This is actually a vector mask thumbnail, which allows you to use shapes to hide certain sections of a layer. This is 90003 how to round corners in Photoshop 90004, without altering the original image.90005 90016 90013 90002 Next, go to the main toolbar, and access the Rounded Rectangle tool by clicking and holding on the normal Rectangle tool. At the top of the screen, you’ll see a set of options for the Rounded Rectangle tool; click on the «Shape layers» option (it looks like a rectangle). 90005 90016 90013 90002 On the right side of the same Options bar, you’ll find a Radius setting. The higher the Radius number, the more rounded the corners will be. We recommend starting with a setting of around 30 pixels, dragging out the shape to see how it looks, and then adjusting the Radius if necessary.90005 90016 90013 90002 When you’re ready to draw the rounded rectangle, go back to the Layers panel and click on the vector mask thumbnail. Now, you can draw out your shape, and everything inside of it will remain visible. To recenter the rectangle, hold down the space bar and then drag on the shape with your cursor. When you release the mouse button, the vector mask will magically round off the corners of your image. 90005 90016 90039.